

The Bambu Lab P2S: a painful journey
When the P2S was announced, I was ecstatic. I was looking for a new 3D printer (as one does…), with support for the AMS 2 Pro, and preferably enclosed. The H2S was already on the market but it was too big and too expensive. The P2S checked all the boxes. All reviewers praised it and the general vibe of the Bambu Lab community was extremely positive. So, naturally, I had to buy it.
Fast forward one week. I got my P2S, unboxed it and started printing. Oh, the woes! Spaghetti! Prints flung off the bed! Prints falling over! Nothing seemed to stick the the plate. And yes, my plates were clean. I know, because I had extensive experience with two Bambu Lab A1 for the past year. My A1s were flawless. Of course, I got the occasional failure, but it was a very rare occurrence. Additionally, as the A1 and the P2S have the same build plate size, I am constantly sharing plates between the two. Prints on the P2S failed consistently, whereas prints on the A1 succeeded. The issue was not the model, the build plate, the filament, the ambient temperature or anything else: it was the P2S itself. All the factors were shared between the A1 and the P2S, yet the former succeeded where the latter failed.
I posted on the Bambu Lab community forum and I met other people with my same problem. With their help, I managed to conquer these failures, but it wasn’t easy.
In this article you will find my observations, my theories, and my solutions to thwart all the obstacles I encountered. Please note that, even though these tweaks worked well for me, they may not for you. There are lots of factors involved, such as ambient temperature and setup, which may yield different results.
Download my profiles
You can download my filament profiles and process profiles as zip files. To learn how to import them, please refer to this reddit post.
My findings
Acceleration
To start off, let’s talk about motion. The P2S wobbles a lot. I mean, a lot. People seem not to see this as a problem, but it is definitely a factor. You should know that my P2S sits above an industrial-grade workbench with metal frame and two large 3cm thick MDF boards. In addition to that, the bottom side of the workbench is stabilized by four 10kg weight bags that I use as stoppers for my gazebo. The surface is then quite stable. However, the default profile for the P2S prescribes crazy acceleration values which, coupled with the wobbly motion, are a recipe for disaster. CoreXY printers tend to be more wobbly because the motion happens farther away from the base, whereas plate slingers are more stable as the movement is closer to the supporting surface.
Solution. Reduce the default accelerations.
- Default acceleration:
6000 - Initial layer travel acceleration:
4000 - Outer wall acceleration:
4000 - Travel acceleration:
8000
Airflow
The P2S airflow system is notoriously controversial. It has two modes. A heating mode, where the vent is closed and it just recirculates air within the chamber - used for high temperature materials. And a cooling mode, where the vent is open and it blows air from the outside ambient into the chamber. This airflow system was problematic for me in two different ways.
PLA
First, in cooling mode, when printing PLA. The outside air temperature was too low. So when the print started and the airflow went into cooling mode, the cold air was blowing straight onto my model. If PLA cools too quickly several things happen: it shrinks, and edges warp. The shrinkage can also cause the first layers to lose contact with the build plate and consequently detach, causing a print failure.
Solution. I printed a fan deflector in PETG and installed it. This was very beneficial on many prints and reduced the issues caused by cold air. I reckon I won’t need it during summar, but for the cold UK winters it just did a wonderful job.
PETG
Now, with PETG, the issue is slightly different but still related to airflow. PETG is a high temperature material, and thus the auxiliary fan works in heating mode. The problem is, the fan is still working. And despite recirculating air, it is still blowing air onto the print, which causes heat dissipation by convection. And the second problem is that the fan cannot be turned off by filament settings.
There is a specific setting called “Fan speed” under Auxilliary part cooling fan, in the Cooling section of a filament profile. The default for PETG is zero, which could lead you to think that it means disabled. It doesn’t. A value of 0 means automatic, i.e. the printer will keep it running regardless. So I was forced to set it to 1%, to really reduce its effect on the print. Additionally, since the right fan cannot be completely disabled via the slicer, the only option to turn it off is via the printer control panel or the Bambu Handy app.
Solution. Set the fan speed to 1%, or manually turn off the right part cooling fan after the print starts.
Flow ratio
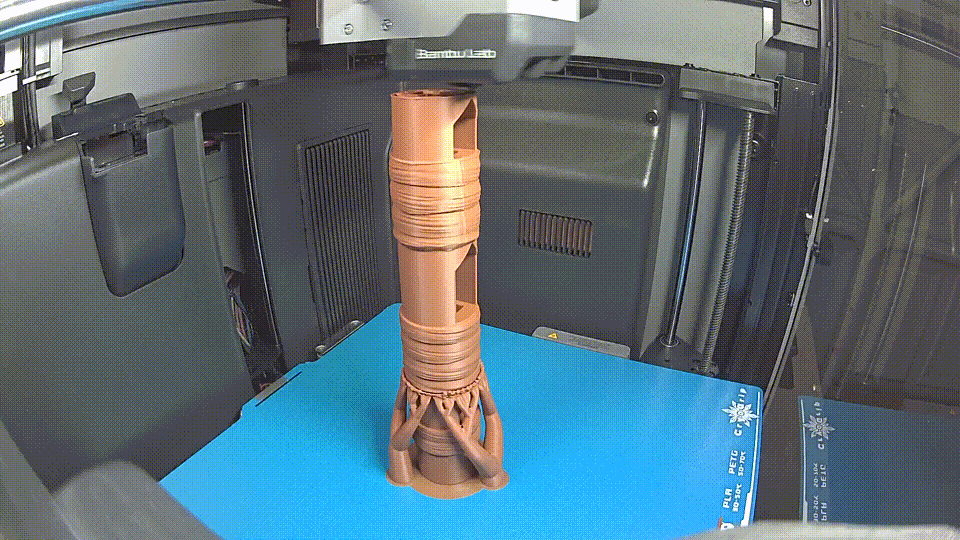
Because of all the failures I encountered, I started to add brims to pretty much everything to increase bed adhesione and reduce warping. After seeing so many brims, I observed something strange. Whereas with the A1 the brim is close enough to the model to hold it in place, when I went to remove a print from the P2S build plate, it came right off and left the brim unscathed. The removal was easy. Too easy. I noticed the brim did not touch the model at all, even when the brim-to-model gap was set to 0. Additionally, the filament lines that formed the brim were slightly too far apart. The brim itself unravelled after removal. This led me to consider that there was something off with the flow ratio.
So my findings here is that, for some reason, even if the parameters are the same between the A1 and the P2S, the latter tends to under-extrude, especially on the first layer.
Solution. Increase the initial layer flow ratio to 1.05. This setting can only be changed if you are in developer mode. After updating the flow ratio, the brims were much more solid and guaranteed good adhesion and stability, without being too hard to remove. I still often set the brim-to-model gap to 0 just to be on the safe side.
Cooling
Here are the default cooling filament settings for PLA Basic for the P2S:

And that’s another problem. There is too much cooling! This issue is again related to the material cooling too fast, with all the consequences I exposed above. Even in the Bambu Lab wiki, they advise to turn off the cooling fan for the first 1 to 3 layers…
Note: Typically, to improve adhesion between the first layer and the build plate, both cooling fans are disabled by default for the first layer (fan speed set to 0).
— Bambu Lab Wiki
… but in the default settings it’s never off! It still blows at 40% even for the first layer. On top of that, the part cooling fan speed is set to 100% all the time. For me this is way too much.
Solution. In addition to turn off the part cooling fan completely for the first 3 layers, I also reduced the speeds by layer to 85% and 95% respectively, and reduced the auxilliary fan speed to 65%.

A few more suggestions
So far I explained all the main factors I could find, but I have a few more suggestions for you. These are situational and may vary depending on your preference.
Infill. For tall or large model I switched to using CROSS HATCH as my infill of choice. It’s very stable, solid, and produces less vibrations than Gyroid.
Build plate. For PETG HF and Rapid PETG, I fell in love with the BIQU CryoGrip Frostbite. It was all-around a very solid build plate with reliable adhesion. Instead, for printing PLA, my go-to build plate is the Bambu Lab Cool Plate SuperTack. It’s super sticky and very reliable. I also just purchased the Cool Plate SuperTack Pro, but I haven’t tried it out: I hope it will improve on durability, as the Super Tack is very delicate and prone to stratching.
Manual brim. Occasionally, I want to print very thin models. When this happen, I don’t 100% trust the P2S to succeed on its own with automatic brims alone. So I make use of the Add primitive tool (right click -> add primitive) to add simple cylinder with a height of 2 layer heights, then I position it underneath the thin model I want to print, and I merge them together. The flat cylinder will function as a solid support for the model, which I will then remove in post-processing with a utility knife. I realise this is a bit more involved, but I think it’s better to spend a bit of time later for post-processing rather than having a failed print.
Conclusions
After tweaking all these settings, my P2S is now much more reliable. I am even able to print very large and very tall models with confidence. It was, however, a tough journey. Whereas the A1 rocked from day one, the P2S took a lot of effort to grow into the good workhorse it is now.
I hope this article will help you fix all the issues I had and conquer them as well as I did!